Home ► RIDE ► FAQs ► Answer
RIDE soon to migrate to another web domain, announced in the new version of the application, while this web domain silently ceases to function! Please update your bookmarks/links once the new version of RIDE is out!
How do I dump an image back to a floppy disk?
Applies to: RIDE 1.7.7 and later
- Click on Disk → Open to open the image to dump to a real floppy disk.
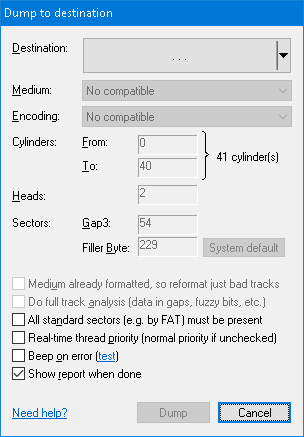
- Click on Disk → Dump to show the Dump to destination dialog.
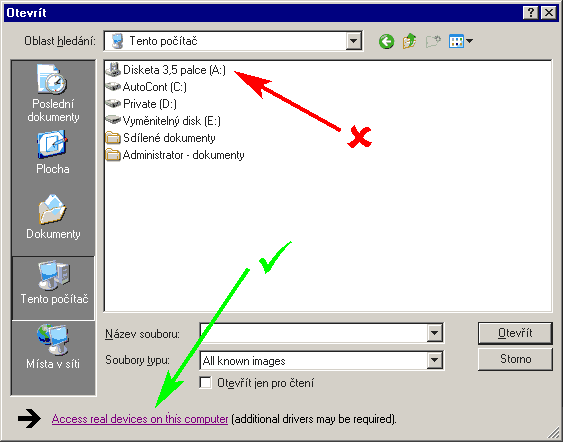
- Click on the Destination button (Alt+D) to show a classical Save file dialog. Don't click on the floppy drive icons! Instead, click on the Access real devices on this computer shown at the bottom of the dialog.
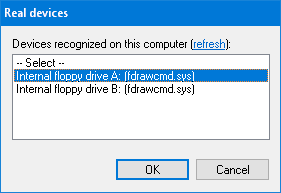
- The application tries to find any of supported devices connected locally to the computer (which may take a while), and lists them in the Real devices dialog, with the most recently used device pre-selected. Confirm the selection by the OK button.
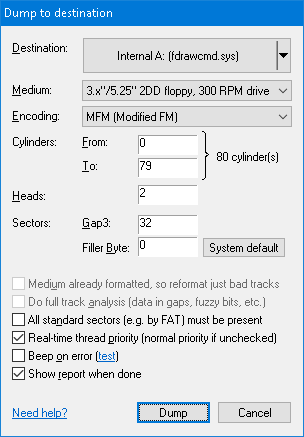
- Back in the Dump to destination dialog, confirm the value set in the Medium combo-box (Alt+M). If it doesn't specify the right floppy type, change it to comply with the floppy inserted in the drive. Such inconsistency may arise, for instance, if the application was unable to recognize the disk operating system (DOS) automatically.
- Specify the range of Cylinders to dump to the floppy (Alt+F, and Alt+T, respectively). You usually may leave the default values (whole floppy will be dumped), unless you are creating a patch.
- If the destination floppy has already been formatted to the target geometry (for instance, you are about to dump a TR-DOS image to a floppy which you know has already been formatted in Betadisk drive), you can tick the Medium already formatted check-box (Alt+A). If ticked, only missing or corrupted tracks will be reformatted, thus speeding up the dump process. If unticked, each track will be formatted. If ticked and the medium is actually not formatted, the dumping may perform slower. Hence, untick this check-box whenever you are not sure about the state of the medium to gain the best performance.
- If the DOS has been recognized by the application, you usually at this moment may click on the Dump button to store the specified number of cylinders to the floppy, as all remaining values in the dialog are set correctly. If the DOS has been not recognized, you very probably will have to adjust them manually as described below.
- The Encoding (Alt+E) specifies the method to represent data on the target disk surface. This combo-box currently always contains just a single option, however, there are known DOSes which support multiple encodings, e.g. early MS-DOS versions. Other encodings will be added over time, so you can safely ignore this combo-box at the moment.
- The Gap3 value (Alt+G) represents the inter-sector gap. Some game producers liked to decrease this value to accommodate an extra sector that normally would not fit in the track (usually as part of their copy-protection scheme, e.g. Titus the Fox game by Titus Interactive). If you stumble upon a track that is apparently longer than common tracks, try to decrease this value. The default for this value derives from recognized DOS, or follows the IBM recommendation if DOS hasn't been recognized.
- The Filler Byte (Alt+B) determines the value that will be used as the initial content of fresh formatted sectors. You usually may leave the default.
- The Do full track analysis checkbox (Alt+A) subjects each track in currently open disk to low-level timing analysis. This analysis consists of (1) search for non-formatted areas, (2) search for data in gaps, and (3) search for fuzzy regions in data. This checkbox is enabled (and ticked by default) if currently open container provides such low-level information (e.g. KryoFlux Stream files or KryoFlux device itself). This checkbox is enabled even if the target container actually doesn't store the low-level information – with this option ticked during dumping to a less featured container (e.g. internal PC floppy controller), you can evaluate on-the-fly which uncommon information, if any, you are about to lose in the less featured container (for instance, you might have lost significant data in a gap as part of a copy-protection).
- The Show report when done checkbox (Alt+R) causes the application to show a summary at the end of the dump. Included in the report is also a summary of what errors arose and a summary of the full track low-level analysis (Alt+A). If observing delays in accessing the floppy drive (e.g. in a highly concurrent environment), be sure to have the Real-time thread priority check-box (Alt+P) ticked.
- Click on the Dump button.
- This step depends on the device you selected in the Real devices dialog:
- Internal PC floppy drive (click to unfold)
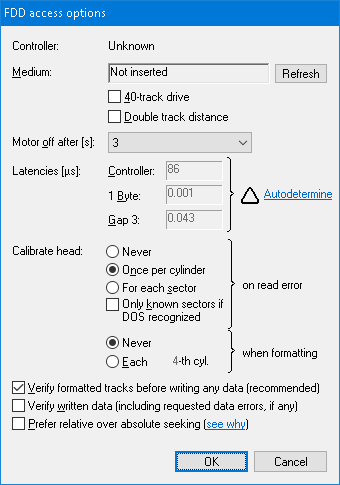
- A FDD access options dialog pops up. Values in the dialog have been optimally preset by the application to generally access a floppy. However, you may find useful to override some settings:
- The following two checkboxes are for working with 40-track floppies: 40-track drive (Alt+4) when ticked specifies that the drive's nominal cylinder count is 40 (and going beyond this limit may destroy the drive), and Double track distance (Alt+D) when ticked specifies if an 80-track drive should be used as a 40-track drive. A warning sign ▲ may wrap both of these checkboxes to indicate potential inconsistency.
- Latencies (Alt+C, Alt+B, and ALT+G) are good to have auto-determined by the application if dumping a copy-protected image (follow on-screen instructions for this option). A warning sign ▲ may appear if latencies not determined or outdated.
- Head calibration which you may turn on for each N-th cylinder to format (Alt+E), or turn it off and prevent head calibration during formatting.
- Formatted track verification (Alt+V) which is recommended to have turned on.
- Verification of written data (Alt+W) which is also stronly recommended to have turned on. Verified are not only good data (that they were written well) but also bad or incomplete data (that they were written badly and in full extent).
- Preference of relative over absolute seeking (Alt+P) which lessens the number of calibrations during dumping of a copy-protected image (see why).
You may leave the remaining values to their defaults and click on OK.
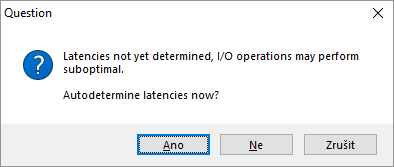
- If not done so before, the application suggests to autodetermine the floppy controller latencies. It is recommended to accept the suggestion by clicking on Yes – with correctly set latencies, the application can perform up to twice as fast than with the default values! Clicking on No, you reject the autodetermination this time, and clicking on Cancel makes the application ask no more about the latencies.
- Greaseweazle or KryoFlux (click to unfold)
- A Flux device access options dialog pops up. The default values usually suffice for reliable writing to a floppy. Below are explained only writing-related settings.
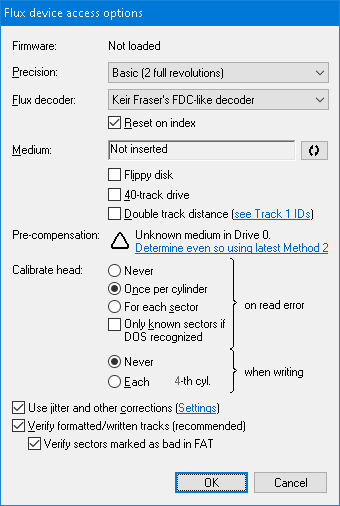
- The following two checkboxes are for working with 40-track floppies: 40-track drive (Alt+4) when ticked specifies that the drive's nominal cylinder count is 40 (and going beyond this limit may destroy the drive), and Double track distance (Alt+D) when ticked specifies if an 80-track drive should be used as a 40-track drive. A warning sign ▲ may wrap both of these checkboxes to indicate potential inconsistency.
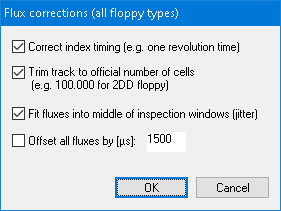
- Input magnetic signal can be improved by applying Jitter and other corrections (Alt+C) to it before sending it to the device. Clicking on the Settings hyperlink, the Flux corrections dialog pops up. Note any corrections are safe to apply only to copy-unprotected disks!
- You should pay a special attention at the pre-compensation which should be determined by the latest method before attempting to format/modify a floppy (see why). If not determined or outdated for specific floppy type and/or drive, a warning sign ▲ appears next to the link to determined/update it.
- The combination of corrections (Alt+C) and pre-compensation is a key to successfull writing (given a reliable magnetic media). If either of them omitted, the reliability of written data is a matter of good luck. In fact, this is a must if intending to write unstructured KryoFlux Stream magnetic signals back to a floppy – otherwise, it's "garbage in, garbage out" as pointed out in KryoFlux user's guide.
- There are several further settings that you might want to revise:
- You may want to revise head calibration strategy during writing – normally off, but you can turn it on for each N-th cylinder to write (Alt+E). The default selection usually suffices.
- It is recommended to have written track verification (Alt+V) turned on. All significant parts of each track are verified, including intersector data (if any). Failures in verifying insignificant bits on the track (e.g. non-sector bits, non-data bits, input fuzzy bits, or "no bits" in non-formatted area) are not reported.
- To skip verification of bad sectors in magnetically unreliable parts of the disk (where verification in the end always fails), untick the Verify bad sectors (Alt+B) checkbox. Leave this checkbox ticked if working with original disks where bad sectors appear on healthy magnetic surface as part of a copy-protection scheme.
- You may leave the remaining values to their defaults and click on OK.
- A dialog displaying the actual progress pops up.
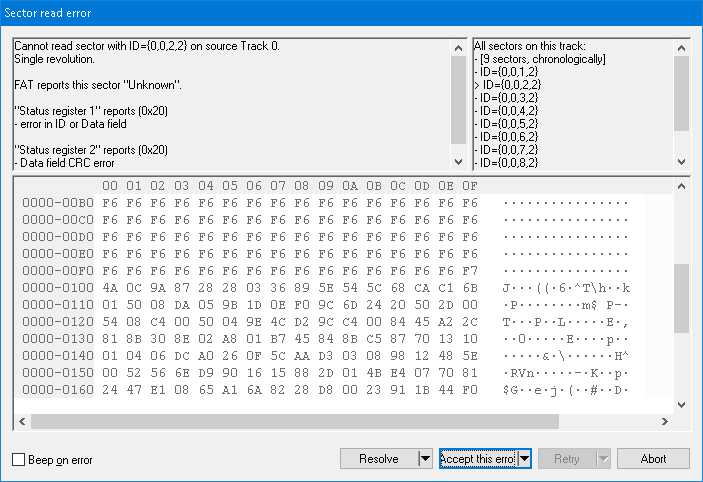
- Occasionally during dumping, the Sector read error dialog may show up, reporting on errors while reading a particular sector (e.g. for a *.DSK source image). The only sensible choice here is to accept all errors (see the Accept button options).
See also