Home ► RIDE ► FAQs ► Answer
RIDE soon to migrate to another web domain, announced in the new version of the application, while this web domain silently ceases to function! Please update your bookmarks/links once the new version of RIDE is out!
How do I merge two images? What is a "patch"?
Applies to: RIDE 1.4 – 1.7.8, discontinued in RIDE 1.7.9 and later
Imagine the situation that you want to create an image of a poorly readable floppy. You try several floppy drives but each reads the floppy with errors in different sectors. You want to merge all tracks that were well read on any of the drives into a single functional image. So you extract the well read tracks into individual patches that you apply to an initial image one by one. This way, the final image with all patches applied will consist of only well readable tracks.
To create a patch from a floppy disk:
- Access the floppy inserted in your drive (see how).
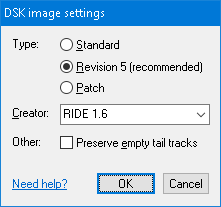
- A patch is created by dumping selected tracks into a *.DSK image (see how) with the Patch option (Alt+P) chosen in its Settings.

To apply a patch to an image:
- Open an image to receive the patch by clicking Disk → Open. If continuing working with an already opened image, you should save your work (Disk → Save) to "commit" the current state of the image – patching is not a transactional operation and in case of failure, the image may get into an inconsistent state (opening a previously saved image rolls back the failed patch).
- Make the opened image accessible for writing by unticking Disk → Write protected.
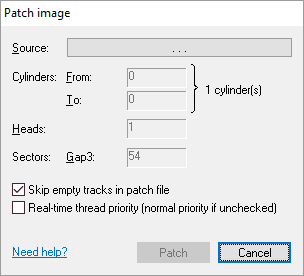
- Click Disk → Apply patch to open the Patch image dialog.

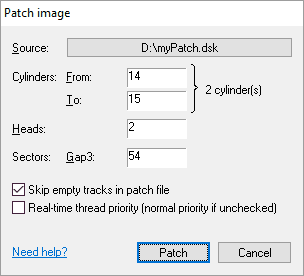
- Click the source patch button (Alt+S) to choose the patch to apply to the opened image – a classical Open file dialog pops up, displaying only *.DSK images. Select the patch file you created earlier and hit OK.
- Specify the range of Cylinders in the patch file to apply to the opened image (Alt+F, and Alt+T, respectively). You usually may leave the default values (whole patch will be applied).
- You usually at this moment may click on the Patch button to apply the specified cylinders in the patch file to the opened target image, as all remaining values in the dialog are set correctly. Only in very special cases you will have to adjust them manually as described below.

- The Heads field (Alt+H) is the number of heads common for both the patch and the opened image. Usually, changing the value makes little sense (smaller values do not apply the whole patch, greater values may cause an error during patching). The Gap3 value (Alt+G) represents the inter-sector gap. Some game producers liked to decrease this value to accommodate an extra sector that normally would not fit in the track (usually as part of their copy-protection scheme). If you stumble upon a track that is apparently longer than the other tracks, try to decrease this value. The default for this value follows the IBM recommendation. Finally, unchecking the Skip empty tracks in the patch file (Alt+E) "unformats" corresponding tracks in opened image.
- A dialog displaying the actual progress will pop up. When done, you will be presented a message on either a full success or failure. In case of a failure, the opened image may be in inconsistent state (that is, patching is not a transactional operation) and it is suggested that you close the image and remove the problems when opening it next, before you retry patching.


